
Constructing a swimming pool is one of the most exciting upgrades that can be made to a residential property. It adds long-term value, enhances outdoor living, and creates a place for leisure and gathering. That said, the process is detailed and involves far more than digging a hole and filling it with water. Understanding what happens at each phase helps set accurate expectations and ensures the project moves forward with fewer surprises.
In the Greater New Orleans area, including Metairie and surrounding communities, certain factors such as high water tables, heavy clay soils, and tight property access points make pool construction unique. From initial design to final inspection, each phase has specific goals, dependencies, and timing considerations.
Phase 1: Design and Permitting
Pool construction begins with a thorough design process. This stage includes a site visit, elevation survey, and design consultation to determine the pool’s layout, dimensions, depth, and features. Elements such as spas, tanning ledges, waterfalls, lighting, and automation systems are discussed and integrated into the design plan.
Once the design is finalized, it is submitted for permitting. In Jefferson Parish and surrounding areas, permits must be obtained before any physical work begins. This involves submitting engineered drawings and ensuring compliance with local zoning setbacks, utility easements, and safety codes. The permitting phase may take anywhere from a few days to several weeks, depending on local office processing times and project complexity.
Phase 2: Excavation
Excavation is the first major on-site activity. The area is cleared, and earth-moving equipment is brought in to dig the pool shape according to plan. Excavation timelines vary depending on soil conditions, property access, and weather. In Metairie, water intrusion due to high water tables is common, and well-point systems or temporary sump pumps are often used to keep the dig area dry.
Unexpected underground obstructions such as tree roots, utility lines, or unstable soils may require adjustments to the plan. These conditions can lead to reinforcement changes, drainage upgrades, or extended preparation time before moving to the next step.
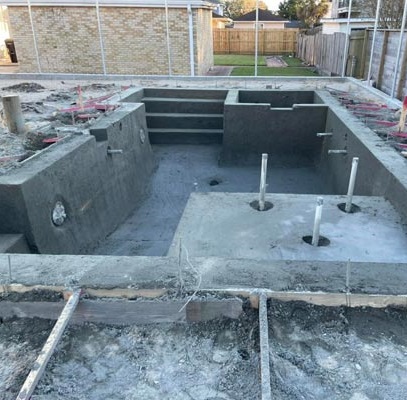
Phase 3: Steel, Plumbing, and Electrical
Once the hole is shaped, a steel rebar framework is installed throughout the pool structure. This reinforcement provides the tensile strength necessary for long-term structural integrity. After the steel is in place, plumbers install the rough plumbing system for the drains, skimmers, jets, and water features. Electricians also install conduit for lighting, automation, and control panels.
This phase typically requires an inspection by the local building department to ensure code compliance. All underground plumbing and bonding must pass inspection before the pool shell can be applied.
Phase 4: Gunite or Shotcrete Shell
The application of the pool shell is a significant milestone. Gunite or shotcrete—forms of sprayed concrete—are applied to the steel framework to create a solid, permanent structure. This is a highly specialized process that involves spraying the material at high velocity to compact it onto the steel.
After application, the shell must cure properly to reach full strength. In the Louisiana climate, daily misting is often recommended for several days to prevent premature drying and cracking. Curing typically takes one to two weeks, depending on weather and material used.
Phase 5: Tile, Coping, and Decking
Once the shell has cured, the next phase includes finishing the pool’s perimeter with tile and coping. Tile lines are installed along the waterline, and coping—usually stone, brick, or poured concrete—is placed around the top edge of the pool.
Following that, the pool deck is constructed. Deck material options include pavers, stamped concrete, or natural stone, all of which must be carefully graded to ensure proper drainage away from the pool. Expansion joints are installed to prevent cracking, and finishes are applied according to the selected design.
Phase 6: Interior Finish and Pool Fill
The final interior surface of the pool is applied next. This may include plaster, pebble finishes, or quartz-based materials. Each finish has its own aesthetic and performance characteristics. Once applied, the pool is immediately filled with water to prevent surface cracking and discoloration.
During the filling and curing period, the pool surface is brushed regularly to prevent material buildup and achieve a smooth finish. Simultaneously, the filtration system, pump, heater, lights, and other equipment are activated and tested.
Phase 7: Final Inspection and Startup
The final step includes inspections for electrical bonding, safety barriers, and plumbing. Inspectors verify the installation meets all local safety standards, including fencing and alarms. Any required corrections are made prior to approval.
Once inspection is complete, the pool is handed over for use. This includes balancing the water chemistry, educating the owner on how to operate the system, and demonstrating the use of any automation features. Maintenance routines are reviewed to ensure long-term performance and appearance.
Additional Considerations
Weather is a major variable throughout the pool construction process. Rain delays concrete pouring, limits excavation, and disrupts scheduling across trades. Material availability can also fluctuate depending on regional supply chains. Communication and flexibility throughout the process help accommodate these challenges.
Building a pool in South Louisiana requires careful planning, appropriate materials, and attention to the unique conditions of the environment. Each phase of construction contributes to the longevity and performance of the finished product.
